Docker adalah program komputer yang melakukan virtualisasi pada level sistem operasi, juga dikenal sebagai "containerization".
Pertama kali dirilis pada tahun 2013 dan dikembangkan oleh Docker, Inc.
Tidak seperti teknologi Sistem Operasi era tahun 2000 ke bawah, setiap sistem operasi harus di install dalam sebuah Komputer untuk menjalankannya.
Docker digunakan untuk menjalankan paket perangkat lunak yang disebut "wadah".
Wadah diisolasi dari satu sama lain dan bundel alat mereka sendiri, perpustakaan dan file konfigurasi, mereka dapat berkomunikasi satu sama lain melalui saluran yang jelas.
Semua kontainer dijalankan oleh kernel sistem operasi tunggal dan karenanya lebih ringan dari mesin virtual.
Wadah dibuat dari "image" yang menentukan jenis konten tepatnya.
Image sering dibuat dengan menggabungkan dan memodifikasi image standar yang diunduh dari repositori publik.
Download & Install “Raspbian Operating System”
- Download Raspbian OS dari Official Website : raspberrypi.org
- Buat bootable image SD Card menggunakan : Etcher
- Boot the Raspberry Pi dengan SD Card tersebut, ikuti langkah langkah pada layar.
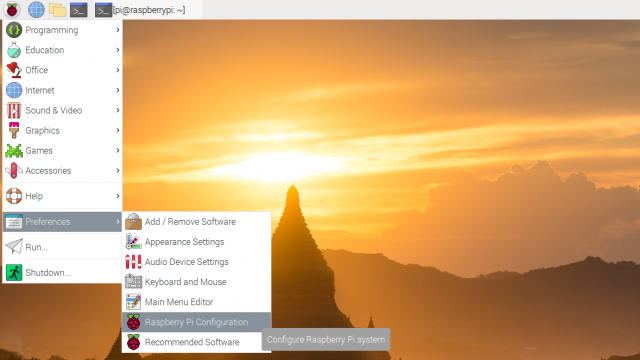
Enabling SSH in Raspbian OS
Default SSH Daemon Raspbian awalnya disable. Jadi perlu di enable.
- Nyalakan Raspberry Pi Configuration di Menu Desktop
- Navigate Interfaces tab
- Pilih Enabled SSH.
- Click OK.

Contoh tersebut jika raspberry kita di install menggunakan Raspberrian Full,
jika kita menggunakan minimal installer, maka command lainnya dapat dilakukan melalui terminal
Enter sudo raspi-config in a terminal window.
$ sudo raspi-config
Select Interfacing Options.
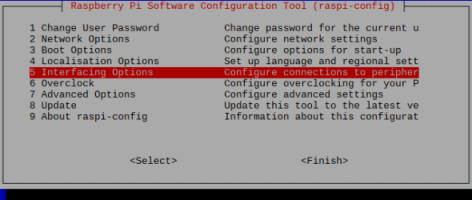
Navigate to and select SSH.
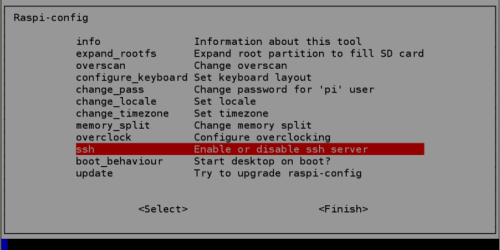
Enable SSH
Choose Yes –> Ok –> Finish
Setup Docker on Raspberry Pi
// Update & Upgrade Raspbian OS
// Open Terminal, update dan upgrade Raspbian OS.
$ sudo apt-get update && sudo apt-get upgrade
// Install Docker
$ curl -sSL https://get.docker.com | sh
// Add permission Pi User untuk menjalankan Docker Commands
$ sudo usermod -aG docker pi
Remove Docker Errors
// Checking Docker Info
$ docker info
// Checking Docker Info
WARNING: No memory limit support
WARNING: No swap limit support
WARNING: No kernel memory limit support
WARNING: No oom kill disable support
WARNING: No cpu cfs quota support
WARNING: No cpu cfs period support
// Now, we need to edit /boot/cmdline.txt file
$ sudo nano /boot/cmdline.txt
tambahkan dua parameters : cgroup_enable=memory swapaccount=1 pada akhir code yang ada, save dan lalu reboot
dwc_otg.lpm_enable=0 console=serial0,115200 console=tty1 root=PARTUUID=85da7cb8-02 rootfstype=ext4 elevator=deadline fsck.repair=yes rootwait quiet splash plymouth.ignore-serial-consoles
Testing Docker & Adding Containers
pi@raspberrypi:~ $ docker run hello-world
Hello from Docker!
This message shows that your installation appears to be working correctly.
To generate this message, Docker took the following steps:
1. The Docker client contacted the Docker daemon.
2. The Docker daemon pulled the "hello-world" image from the Docker Hub.
(arm32v7)
3. The Docker daemon created a new container from that image which runs the
executable that produces the output you are currently reading.
4. The Docker daemon streamed that output to the Docker client, which sent it
to your terminal.
To try something more ambitious, you can run an Ubuntu container with:
$ docker run -it ubuntu bash
Share images, automate workflows, and more with a free Docker ID:
https://hub.docker.com/
For more examples and ideas, visit:
https://docs.docker.com/get-started/
Demikian cara installasi docker pada raspberry pi, adapun cara lainnya adalah dengan menggunakan script.. lebih efektif dengan menggunakan script yang dapat dipelajari dari sini
https://github.com/gcgarner/IOTstack/wiki
Youtube Berguna : https://www.youtube.com/watch?v=a6mjt8tWUws
Mudah mudahan manfaat.